
Overview
From Manage Trucks, you can search for a truck by Plate number, RFID number, VIN, or Description. Also, you can open a list of all trucks in the system.
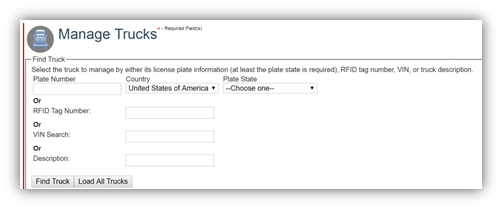
In the Main Menu, select Trucker Check, and then select Manage Trucks to open the Manage Trucks screen. In this screen you can search by various options. Enter the information in the relevant field(s) and then click Find Truck.
Alternatively, click Load All Trucks to open a list displaying all trucks that have been added to the system.
Updating Truck Details
You can view truck details in two ways:
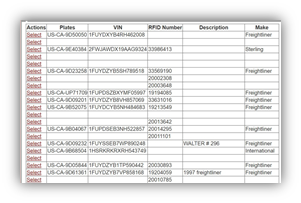
- In the Manage Trucks screen, search for a truck or view the list of trucks and then click Select in the Actions column to open the details for the truck.
- In the Manage Drivers screen, Truck tab.

To Update Truck Specs
In the Truck Information screen, Truck Specs tab, enter new details for Description or Remove the VIN and then click Update Truck.

To Update or Add a License Plate Number
In the Truck Information screen, License Plate tab, either click Edit to enter new plate details and then click Update Plate, or click the Add New Plate button to create a new plate for the truck and then click Create New Plate.

To Update or Add an RFID Tag Number
In the Truck Information screen, License Plate tab, enter the RFID number in the fields (you must enter the number twice) and then click Add RFID Tag button. If there is already a number associated with the truck the newly entered number will replace the existing number.

To Update or Add Insurance Details
In the Truck Information screen, Insurance tab, select the Owner Type (Person or Company), and then enter the Name, Email, Insurance Carrier, Insurance Policy number, and Policy Expiration date, and then click Submit. All fields are required.

Removing Trucks
You can remove a truck from a driver in the system via the Disassociate button in the Truck Driver Information screen.
- In the Main Menu, click Trucker Check submenu, and then click Manage Drivers. In the Manage Drivers screen, locate the driver you want to disassociate a truck for and then double-click on the driver’s name to open the Truck Driver Information screen.
- In the bottom half of the screen, click on the Trucks tab, select the truck you want to remove from the list and then click Disassociate. You will see a warning message, click OK to continue and disassociate the selected truck or click Cancel to continue without disassociating the truck.
Adding a Truck onto an Existing Driver
You can add a truck to a driver via the Manage Drivers screen.
NOTE: If you are replacing the driver’s current vehicle, be sure to add the new truck to their profile BEFORE removing the old. Drivers must have at least one vehicle registered under their name at all times to be active within the company. Removing the vehicle first will result in the driver being removed and will require the driver to be re-added to the account.
- In the Main Menu, click Trucker Check sub-menu, and then click Manage Drivers. In the Manage Drivers screen, locate the driver you want to add a truck for and then double-click on the driver’s name to open the Truck Driver Information screen.
- In the bottom half of the screen, click on the Trucks tab, and then click Add Truck. The Add Truck pop-up screen will display where you can select the Country and State and enter the Plate Number.
- Then enter the VIN in the field.
Please Note: A Vehicle Identification Number (VIN) is a unique 17 character serial number used by motor vehicle manufacturers to identify individual motor vehicles. VINs consist of 17 characters which do not include the letters I, O or Q. Letters must be entered in UPPER CASE. - Select the Fuel type and then click OK to create the truck and associated it with the selected driver.